How to Make 5 Layer Dessert Bars
You need to make these 5 layer dessert bars when you’re in the mood for something rich, chewy, and unapologetically indulgent.
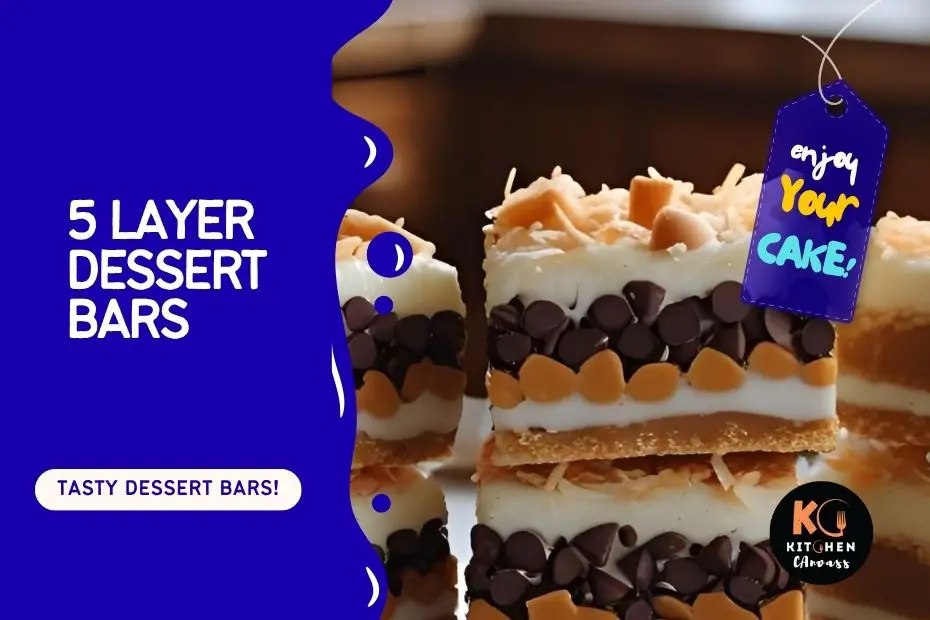
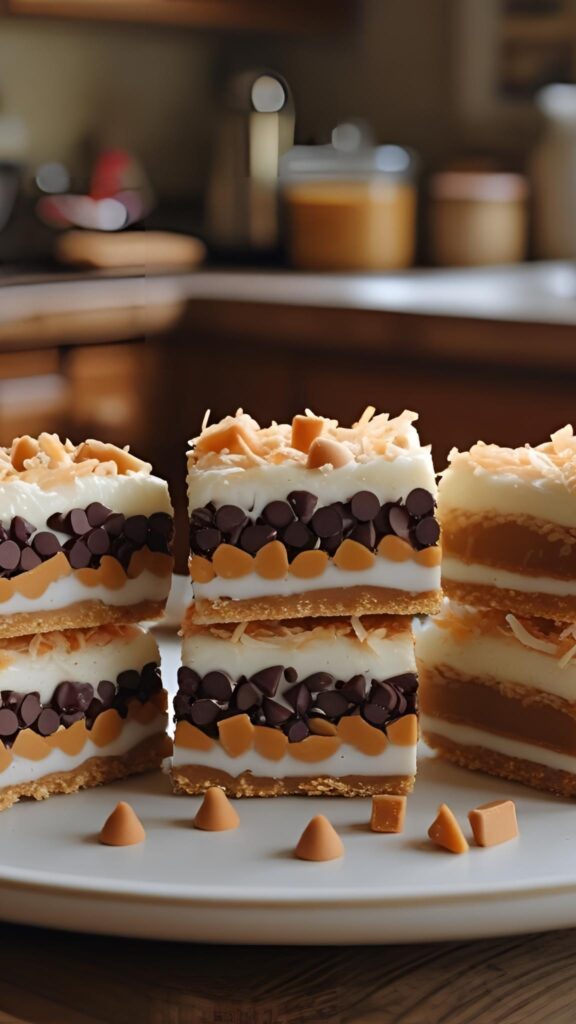
Each layer stacks up like a surprise—starting with a buttery graham cracker base, followed by chocolate chips, butterscotch morsels, sweet shredded coconut, and a final pour of silky condensed milk to bind everything together.
The beauty of this recipe is how little effort it takes to deliver bakery-style results. There’s no complicated creaming or chilling—just some layering and baking.
As the bars cook, the condensed milk melts into the layers and gives everything a gooey, golden finish.
You can switch up some of the components, too, depending on your pantry—walnuts, white chocolate, or peanut butter chips can step in where needed.
—
Recipe Overview
| Prep Time | Bake Time | Cooling Time | Total Time | Course | Servings |
|---|---|---|---|---|---|
| 15 minutes | 25–30 minutes | 1 hour | 1 hour 45 minutes | Dessert / Snack | 12 bars |
—
Ingredients
| Ingredient | For 6 Bars | For 12 Bars | Alternatives |
|---|---|---|---|
| Graham cracker crumbs | 1 cup | 2 cups | Crushed digestive biscuits |
| Butter (melted) | ¼ cup | ½ cup | Coconut oil |
| Semi-sweet chocolate chips | ½ cup | 1 cup | Dark chocolate or chopped bars |
| Butterscotch chips | ½ cup | 1 cup | Peanut butter or white chocolate chips |
| Sweetened shredded coconut | ½ cup | 1 cup | Unsweetened flakes or chopped nuts |
| Sweetened condensed milk | ½ can (7 oz) | 1 full can (14 oz) | Evaporated milk + sugar (less ideal) |
—
Tools You’ll Need (with Alternatives)
- 8×8 inch baking pan (or 9×9 inch)
- Mixing bowls (or any large container)
- Measuring cups/spoons (or digital scale)
- Parchment paper (or nonstick foil)
- Rubber spatula (or large spoon)
- Oven mitts (or thick kitchen towel)
—
How to Make 5 Layer Dessert Bars
The layering technique is key here—each component needs to be added in the right order to achieve the perfect mix of chew, crunch, and melt.
—
Step 1: Prepare the Crust
You need to combine graham cracker crumbs and melted butter in a bowl and mix until it feels like damp sand.
Press this into the bottom of a parchment-lined baking pan using a flat utensil. Pressing firmly ensures the crust stays intact after baking.
Tip: You can slightly pre-bake the crust for 5 minutes at 350°F if you want it extra firm.
—
Step 2: Add Chocolate and Butterscotch Layers
Sprinkle chocolate chips over the crust, followed by the butterscotch chips. Make sure they are spread evenly so that each bite has a little of both.
If you like variety, you can add a mix of peanut butter chips or white chocolate here.
—
Step 3: Sprinkle the Coconut
You need to add shredded coconut next. This adds chewiness and a slight toasty crunch once baked.
If you’re using unsweetened flakes, you can dust a bit of powdered sugar to balance it out.
—
Step 4: Pour the Condensed Milk
Slowly pour the sweetened condensed milk over everything, covering the layers evenly.
Don’t rush this step—move the can or bowl around the surface to make sure the liquid reaches the corners and doesn’t just pool in the center.
—
Step 5: Bake and Cool
Bake in a preheated oven at 350°F (175°C) for about 25–30 minutes. The top should turn golden brown, and the edges will bubble slightly.
Let the bars cool completely in the pan—this takes at least 1 hour and ensures clean cuts.
—
Decoration & Serving Tips
- Sprinkle extra coconut on top before baking for a toasty finish
- Dust with powdered sugar after cooling for a soft, elegant look
- Serve with a scoop of vanilla ice cream or espresso for a complete dessert plate
—
Variations to Try
- Nutty Crunch Layer: Add chopped pecans, walnuts, or almonds between the coconut and milk layer
- Salted Caramel: Swirl 2 tablespoons of caramel into the top layer before baking
- Mocha Swirl: Add 1 tsp instant espresso to the condensed milk before pouring for a subtle coffee twist
- Gluten-Free Version: Use gluten-free graham crackers for the crust
—
Storing Tips
- Store in an airtight container at room temp for 3–4 days
- Refrigerate to extend freshness to 6–7 days
- Freeze individual bars in wax paper and a zip-top bag for up to 2 months; thaw before serving
—
Extra Tips
- Press crust firmly to prevent crumbling
- Pour condensed milk slowly and evenly to avoid dry corners
- Cool fully before slicing—warm bars will be sticky and fall apart
- Use parchment paper for easy lifting and clean cuts
—
Common Mistakes & Solutions
| Mistake | Fix | Prevention |
|---|---|---|
| Crust falls apart | Add more melted butter or press harder | Use flat-bottom utensil to compact evenly |
| Overcooked top | Trim off burnt edges | Check at 25-minute mark and tent with foil if needed |
| Dry corners | Add drizzle of sweetened milk over dry parts | Pour condensed milk to reach all edges |
| Sticky slices | Wipe knife between cuts | Let bars cool completely before cutting |
—
These 5 layer dessert bars are easy to make but deliver big flavor and texture. Try them out, and let us know how you made them your own!