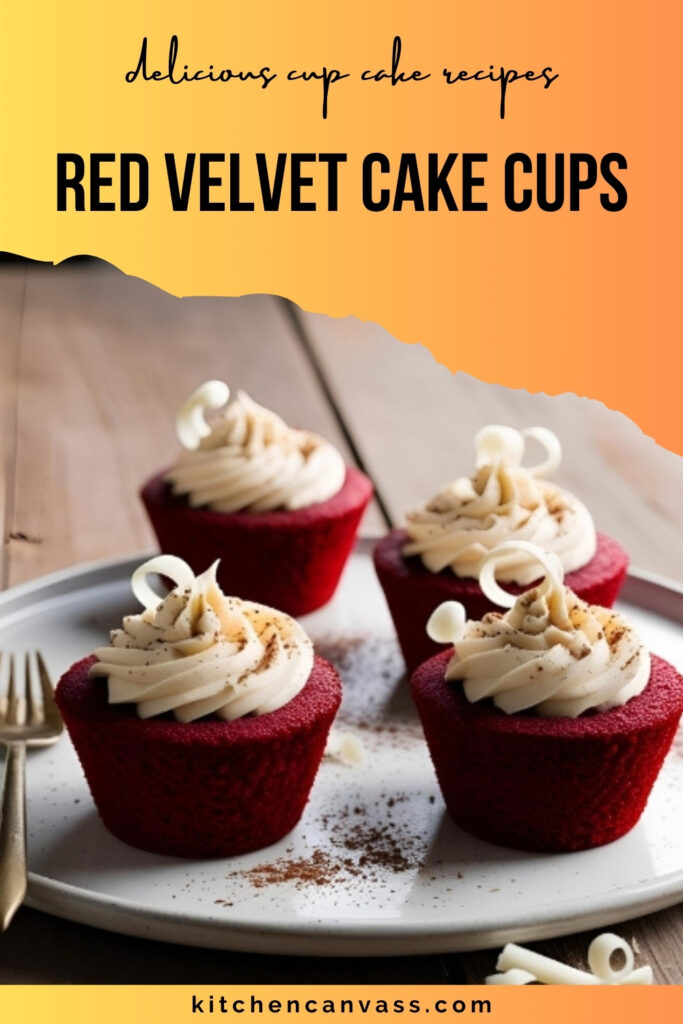
Red Velvet Cake Cups – A Perfect Individual Dessert
Red velvet cake cups offer everything you love about classic red velvet cake—moist texture, subtle cocoa flavor, and rich cream cheese frosting—presented in beautiful, individually served portions.
Whether you’re preparing dessert for a party, a romantic dinner, or simply a treat-yourself moment, these cake cups deliver elegance and ease.
The base cake is made from scratch, ensuring a soft crumb and deep color. You’ll layer or top them with homemade cream cheese frosting for the perfect finish.
Prep Time, Cooking Time & Details
| Prep Time | Cook Time | Total Time | Course | Cuisine | Serving |
|---|---|---|---|---|---|
| 20 mins | 18–20 mins | ~40 mins | Dessert / Cups | American-style | 6–8 |
Ingredients Table
| Ingredient | Quantity (6 Servings) | Quantity (12 Servings) | Notes/Alternatives |
|---|---|---|---|
| All-purpose flour | 1 cup | 2 cups | Sifted for smooth batter |
| Granulated sugar | 3/4 cup | 1 1/2 cups | |
| Unsweetened cocoa powder | 1 tbsp | 2 tbsp | Optional for stronger chocolate flavor |
| Baking soda | 1/2 tsp | 1 tsp | |
| Salt | 1/4 tsp | 1/2 tsp | |
| Eggs | 1 | 2 | Room temperature |
| Buttermilk | 1/2 cup | 1 cup | Can use milk + vinegar as sub |
| Vegetable oil | 1/2 cup | 1 cup | |
| White vinegar | 1 tsp | 2 tsp | Helps with texture |
| Vanilla extract | 1 tsp | 2 tsp | |
| Red food coloring | 1 tbsp | 2 tbsp | Liquid or gel |
For Cream Cheese Frosting
| Ingredient | Quantity (6 Servings) | Quantity (12 Servings) | Notes |
|---|---|---|---|
| Cream cheese (softened) | 4 oz | 8 oz | Full fat preferred |
| Butter (softened) | 1/4 cup | 1/2 cup | Unsalted |
| Powdered sugar | 1 cup | 2 cups | Adjust to taste |
| Vanilla extract | 1 tsp | 2 tsp |
Tools & Equipment
| Item | Alternative / Notes |
|---|---|
| Mixing bowls | Any large and medium bowls |
| Electric mixer or whisk | Hand mixer or stand mixer works well |
| Measuring cups/spoons | Accurate measurements matter in baking |
| Cupcake or dessert cups | Clear plastic, paper cups, or mini glass jars |
| Spoon or ice cream scoop | Helps with even batter distribution |
| Oven | Preheated to 350°F (175°C) |
| Cooling rack | Optional but helpful for air circulation |
Let’s Make Red Velvet Cake Cups
These cake cups are simple to make at home from scratch. Here’s how you can prepare the moist red velvet base and assemble it beautifully.
Step 1: Preheat and Prepare
Start by preheating your oven to 350°F (175°C). If you’re baking the red velvet base in a pan before assembling in cups, grease an 8-inch square pan or line with parchment paper.
Alternatively, you can bake the batter directly in oven-safe glass cups if they’re heat resistant.
Step 2: Mix the Dry Ingredients
In a large bowl, sift together the flour, cocoa powder, baking soda, and salt. This step ensures an even and smooth cake texture without clumps.
Step 3: Combine the Wet Ingredients
In another bowl, whisk together sugar, vegetable oil, egg, buttermilk, vinegar, vanilla extract, and red food coloring. Whisk until the mixture turns silky and vibrant red.
Step 4: Combine Wet and Dry Mixtures
Gradually add the dry ingredients into the wet, folding with a spatula or low-speed mixer until you get a lump-free, smooth batter. Do not overmix—it can make the cake dense.
Step 5: Bake the Cake Base
Pour the batter into your prepared cake pan and bake for 18–20 minutes, or until a toothpick inserted comes out clean.
If baking directly in cups, fill each only halfway and adjust the baking time to around 16–18 minutes.
Step 6: Cool and Cut
Let the cake cool completely on a wire rack. If baked in a pan, slice it into cubes or circles (using a cookie cutter) to layer into serving cups.
Step 7: Prepare the Cream Cheese Frosting
Using a hand mixer, beat the softened cream cheese and butter together until fluffy. Gradually add powdered sugar and vanilla, beating until smooth and spreadable.
Step 8: Assemble the Cups
In each dessert cup:
- Add a layer of red velvet cake pieces.
- Pipe or spoon in cream cheese frosting.
- Repeat the layering once more.
- Top with a final swirl of frosting.
Chill for 10–15 minutes before serving for best texture.
Serving & Decoration Tips
- Sprinkle crushed red velvet crumbs on top for texture.
- Add mini heart sprinkles or edible pearls for festive appeal.
- Top with a fresh strawberry or cherry for contrast.
Variation to Try
Mini Red Velvet Trifles
Instead of layering twice, make smaller one-layer versions with cake + frosting. Garnish with chocolate shavings.
How: Use shot glasses or mini cups. Pipe one swirl of frosting on top of cake cubes and serve chilled.
Chocolate Drizzled Version
Drizzle melted dark or white chocolate over the final frosting layer.
How: After assembling the cups, melt chocolate chips and use a spoon or piping bag to drizzle across the top.
Red Velvet Cream Cheese Swirl
Create a swirl pattern inside the cup by alternating spoonfuls of frosting and batter pre-baking (only for oven-safe cups).
How: Add 1 tbsp batter, then 1 tsp frosting, then batter again and gently swirl with a toothpick before baking.
Storage Guidelines
- Store assembled cups in refrigerator for up to 3 days.
- Keep frosting separate if assembling later.
- Do not freeze with frosting; freeze only the cake base.
Common Mistakes & Solutions
| Mistake | Issue Caused | Solution |
|---|---|---|
| Overmixing batter | Dense and tough cake | Mix until just combined |
| Using cold ingredients | Batter won’t mix well | Use room temperature eggs and buttermilk |
| Skipping vinegar | Flat texture, muted color | Vinegar reacts with soda for lift |
| Not cooling cake before frosting | Melts the frosting | Allow complete cooling |
Red Velvet Cupcake Frosting Alternatives
- Mascarpone whipped frosting for a lighter option
- White chocolate ganache for a richer topping
Cup Assembly Presentation Ideas
- Layer in clear plastic wine cups for elegance.
- Serve in mason jars tied with a ribbon.
- Top with edible gold leaf for luxury presentations.
These red velvet cake cups offer all the flavor of traditional cake in a format that’s both elegant and practical.
Try making a batch and personalize them with garnishes or frostings. Don’t forget to share your versions and feedback in the comments!