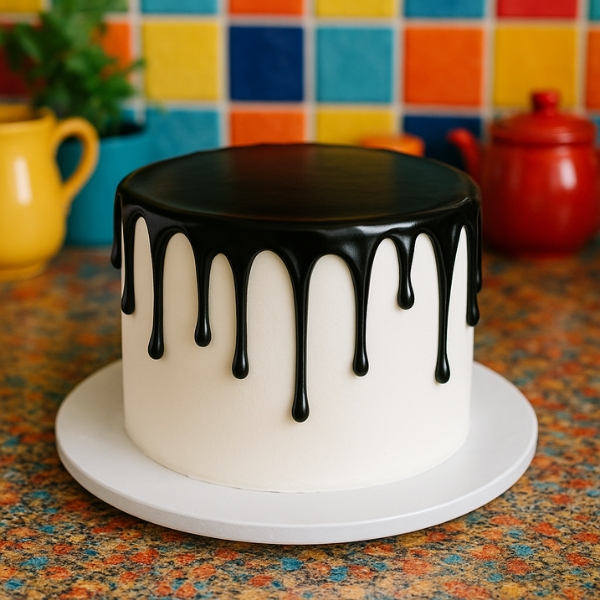
How to Make a Black and White Drip Cake
A black and white drip cake blends simplicity with sophistication. It’s the edible version of a tuxedo—bold, clean, and striking in appearance.
The deep, glossy black drip against a pure white frosting creates instant visual drama, and inside, you can go classic with vanilla layers, or add in chocolate for an even more satisfying bite.
This cake is ideal for any celebration where you want dessert to double as a showpiece. Best of all, the sharp look isn’t hard to achieve—you just need some patience and the right order of steps.
At-a-Glance Baking Info
| Prep Time | Cook Time | Total Time | Course | Cuisine | Servings |
|---|---|---|---|---|---|
| 35 minutes | 40 minutes | 1 hour 15 minutes | Dessert | Modern Western | 10–12 slices |
Ingredient Table: Cake + Drip
| Ingredient | For 6 Servings | For 12 Servings | Alternatives |
|---|---|---|---|
| All-purpose flour | 1½ cups | 3 cups | Cake flour (lighter texture) |
| Sugar | 1 cup | 2 cups | Brown sugar (for caramel tone) |
| Eggs | 2 | 4 | Flax eggs or yogurt (vegan) |
| Butter (unsalted) | ½ cup | 1 cup | Margarine or vegetable oil |
| Vanilla extract | 1 tsp | 2 tsp | Almond extract |
| Milk | ½ cup | 1 cup | Buttermilk or oat milk |
| Baking powder | 1½ tsp | 3 tsp | Self-rising flour |
| White chocolate chips | ½ cup | 1 cup | Milk chocolate chips |
| Heavy cream | ¼ cup | ½ cup | Coconut cream |
| Black food coloring (gel) | few drops | few drops | Activated charcoal (natural) |
What You’ll Need
- Two round cake pans
- Hand mixer or stand mixer
- Rubber spatula
- Parchment paper
- Cooling rack
- Offset spatula
- Knife or cake leveler
- Heat-safe bowl (for drip)
- Piping bag or spoon
How to Make the Black and White Drip Cake
Before starting, make sure all ingredients are at room temperature and your workspace is organized.
Bake your cake first so it has time to cool completely before you apply the drip.
Step 1: Mixing the Batter
Cream butter and sugar until fluffy. Add eggs one at a time, mixing well. In another bowl, sift together flour and baking powder.
Alternate adding the dry mix and milk into the butter mixture, starting and ending with dry. Stir in vanilla at the end.
Step 2: Bake and Cool
Preheat oven to 350°F (175°C). Line pans with parchment and grease. Divide batter evenly. Bake for 35–40 minutes or until a toothpick inserted comes out clean.
Cool completely on a rack before handling.
Step 3: Apply Frosting
Use a white buttercream or whipped cream cheese frosting. Start with a crumb coat and chill the cake for 15–20 minutes.
Then apply a smooth final coat using a spatula. Try to get the edges as even as possible—the cleaner the surface, the better the drip looks.
Step 4: Make the Black Drip
Heat heavy cream until steaming (not boiling). Pour over white chocolate and stir until melted. Add black food coloring gel until you get a deep, rich tone.
Let cool slightly before applying so it thickens and doesn’t run too far down the cake.
Step 5: Apply the Drip
Use a spoon or piping bag to gently drip around the edges. Start at the top edge and let the ganache slide down naturally.
Add more in the center if you want a filled top.
Step 6: Finishing Touches
Sprinkle black and white sugar pearls, edible silver stars, or leave it bare for a sharp minimal look. Refrigerate the cake for 30 minutes before slicing.
Decoration & Serving Ideas
- Add chocolate curls or shards for extra drama
- Top with macarons, blackberries, or Oreo halves
- Dust the top with powdered sugar for contrast
- Serve chilled or room temperature—both work well
Variations to Explore
- Marble Inside: Swirl chocolate and vanilla batter for a visual surprise
- All-Chocolate Base: Use chocolate cake layers with white frosting
- Oreo Filling: Add crushed Oreos between layers for flavor and crunch
- Reverse Colors: White drip on a black frosted cake
Storage Instructions
- Store in the refrigerator for up to 4 days
- Bring to room temperature before slicing
- Wrap individual slices for freezing (lasts up to 2 months)
Extra Tips for Success
- Use gel food coloring—not liquid—for stronger pigment
- Test the drip on the side of a glass first to check flow
- Always chill cake before adding drip for cleaner lines
- Level your cake layers for a stable, even finish
Mistakes to Avoid & Quick Fixes
| Mistake | Fix | Prevention |
|---|---|---|
| Drip runs too far | Chill cake and thicken ganache | Let drip cool before applying |
| Black color looks gray | Add more gel coloring | Use oil-based or gel colors only |
| Cake layers sliding | Insert skewers through center | Chill cake between frosting steps |
| Frosting is uneven | Use a bench scraper | Rotate cake on a turntable |
This black and white drip cake is more than just stylish—it’s delicious and rewarding to make.
Once you’ve tried it, let us know how it went or share your own twist on the recipe in the comments. Don’t forget to snap a photo—it deserves it.