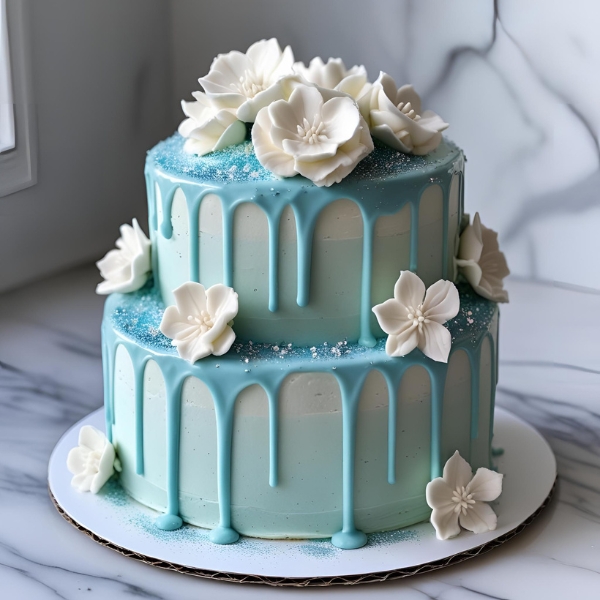
How to Make a Blue Drip Cake
A blue drip cake offers a vibrant, eye-catching centerpiece for celebrations ranging from birthdays to baby showers.
The smooth frosting acts as a base, while the blue drip adds a striking visual that can be customized in shades from pastel to deep navy.
This cake combines simple elegance with playful color, making it versatile for many occasions.
The drip is typically made with white chocolate ganache tinted with blue food coloring, providing a glossy, flowing effect.
When paired with complementary decorations like white sprinkles or edible pearls, it creates a fresh and modern look.
Recipe Overview
| Prep Time | Cook Time | Total Time | Course | Cuisine | Servings |
|---|---|---|---|---|---|
| 25 minutes | 30 minutes | 55 minutes (plus chilling) | Dessert | Western | 10–12 slices |
Ingredients (Cake and Blue Drip)
| Ingredient | For 6 Servings | For 12 Servings | Alternatives |
|---|---|---|---|
| All-purpose flour | 1½ cups | 3 cups | Cake flour (lighter crumb) |
| Sugar | 1 cup | 2 cups | Brown sugar or coconut sugar |
| Butter (softened) | ½ cup | 1 cup | Margarine or oil |
| Eggs | 2 | 4 | Flax eggs or yogurt |
| Milk | ½ cup | 1 cup | Almond, oat, or soy milk |
| Vanilla extract | 1 tsp | 2 tsp | Almond or lemon extract |
| Baking powder | 1½ tsp | 3 tsp | Self-rising flour (adjust flour accordingly) |
| White chocolate chips (for drip) | ½ cup | 1 cup | White candy melts |
| Heavy cream | ¼ cup | ½ cup | Coconut cream |
| Blue gel food coloring | 2-3 drops | 4-6 drops | Natural blue spirulina powder |
| Sprinkles or edible pearls | 2 tbsp | ¼ cup | Shredded coconut or silver dragees |
Tools You’ll Need (with Alternatives)
- Mixing bowls (or large containers)
- Hand or stand mixer (or whisk)
- Measuring cups and spoons (or kitchen scale)
- Two round cake pans (or springform pans)
- Cooling rack (or wire rack)
- Offset spatula (or butter knife)
- Heatproof bowl (or small saucepan)
- Spoon or piping bag (or zip-top bag with corner cut)
How to Make the Blue Drip Cake
Start by prepping all ingredients and preheating the oven. Once cake layers are baked and cooled, you’ll make the frosting and the blue drip glaze.
Step 1: Prepare the Cake Batter
Cream the softened butter and sugar until fluffy. Add eggs one at a time, mixing thoroughly.
Sift flour and baking powder together, then gradually add to wet mixture alternating with milk. Mix in vanilla extract.
Step 2: Bake Cake Layers
Preheat oven to 350°F (175°C). Grease and line cake pans. Pour batter evenly. Bake for 30 minutes or until a toothpick inserted comes out clean.
Cool on a rack.
Step 3: Frost the Cake
Apply your chosen frosting evenly. A white buttercream works well to contrast the blue drip.
Chill the frosted cake before applying drip.
Step 4: Prepare the Blue Drip
Heat heavy cream until hot but not boiling. Pour over white chocolate chips in a bowl. Let sit one minute, then stir until smooth.
Add blue gel food coloring drop by drop until desired shade is achieved.
Step 5: Apply the Drip
Use a spoon or piping bag to drip the blue glaze over the edges of the cake. Pour remaining glaze on top and smooth with an offset spatula.
Step 6: Add Final Decorations
Sprinkle edible pearls or sprinkles over the drip before it sets. Chill the cake for at least 30 minutes before serving.
Decoration and Serving Tips
- Add white or silver edible pearls to complement the blue drip
- Top with fresh blueberries or white chocolate shards
- Use blue-toned cake toppers for themed events
- Keep chilled for clean slices and drip hold
Variations to Try
- Navy Blue Drip: Increase food coloring for a darker, dramatic look. Great for formal occasions.
- Pastel Blue Drip: Use less food coloring or mix with white for soft, baby shower-friendly tones.
- Blueberry Glaze Drip: Use blueberry puree mixed with powdered sugar and a little cream for natural flavor and color.
- Two-Tone Drip: Combine light and dark blue drips alternately for a layered effect.
Storing Tips
- Store the cake in the refrigerator, covered loosely
- Best consumed within 2–3 days for freshness
- Wrap leftover slices tightly and freeze if needed
Extra Tips for Best Results
- Use gel food coloring to avoid runny drip
- Chill cake thoroughly before dripping to prevent melting
- Practice dripping on parchment paper before cake application
- Add sprinkles immediately after drip application for best adhesion
Common Mistakes & How to Fix Them
| Mistake | Solution | Prevention |
|---|---|---|
| Drip too thin or runny | Chill glaze until slightly thickened | Use gel food coloring and chill cake well |
| Uneven drip length | Apply drip slowly and carefully | Practice dripping on a plate first |
| Frosting melts | Refrigerate cake before drip | Use stable frosting and chill cake |
| Sprinkles sink too deep | Apply sprinkles immediately after drip | Use proper drip consistency |
Let’s Bake and Brighten Up with Your Blue Drip Cake
This blue drip cake offers a fresh, vibrant option to impress guests and celebrate any occasion.
Try it yourself and share how you styled your creation!