Bright & Easy Summer Dessert Bars You’ll Want to Make on Repeat
Summer dessert bars are the perfect way to enjoy the season’s sweet, juicy flavors without spending hours in the kitchen.
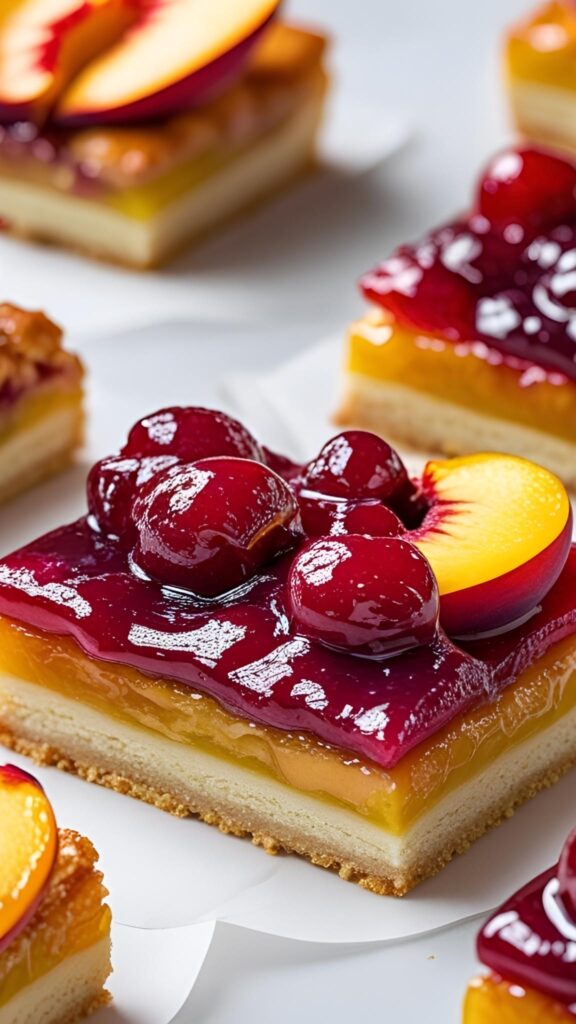
These bars are soft, cool, and bursting with vibrant fruit like strawberries, peaches, or blueberries, layered over a buttery crust and finished with a chilled creamy topping.
They’re portable, no-fuss, and ideal for picnics, cookouts, or any sunny-day craving.
You’ll begin with a simple base — I prefer a shortbread-style crust made with butter and flour — then bake it lightly before adding a creamy layer of cream cheese and whipped topping.
The fruit layer can be anything from fresh sliced peaches to macerated berries or a spoonable fruit jam.
Finish with more whipped topping or a sprinkle of crushed graham crackers, and chill before slicing. It’s light, tangy, sweet, and made to be shared.
Recipe Overview
| Prep Time | Cook Time | Chill Time | Total Time | Course | Servings |
|---|---|---|---|---|---|
| 20 minutes | 15 minutes | 2 hours | 2 hours 35 minutes | Dessert | 12 bars |
Ingredients
| Ingredient | For 6 Bars | For 12 Bars | Alternatives |
|---|---|---|---|
| All-purpose flour | ¾ cup | 1½ cups | Graham cracker crumbs |
| Butter (melted) | ¼ cup | ½ cup | Coconut oil |
| Powdered sugar | 2 tbsp | ¼ cup | Maple sugar |
| Cream cheese (softened) | 4 oz | 8 oz | Greek yogurt (thickened) |
| Whipped topping | 1 cup | 2 cups | Stabilized whipped cream |
| Fresh fruit (mixed berries, peaches) | 1 cup | 2 cups | Fruit preserves |
| Honey or fruit jam | 2 tbsp | ¼ cup | Agave syrup |
| Lemon juice | 1 tsp | 2 tsp | Lime juice |
Tools You’ll Need (with Alternatives in Brackets)
- 8×8 or 9×9 baking pan (or rectangular glass dish)
- Mixing bowls (or large containers)
- Electric mixer (or strong whisk)
- Spatula (or butter knife)
- Measuring cups and spoons (or digital scale)
- Knife and cutting board (for fresh fruit)
- Parchment paper (or greased foil)
- Fridge for chilling
How to Make Summer Dessert Bars
These bars are all about layering fresh flavor with creamy textures. Start with the crust, move to the creamy middle, and finish with fruit on top.
Step 1: Make and Bake the Crust
Preheat oven to 350°F (175°C). In a bowl, stir together flour, powdered sugar, and melted butter until crumbly. Press this into a lined or greased baking pan.
Bake for 12–15 minutes until just golden. Cool completely before layering the filling.
Step 2: Prepare the Creamy Layer
In a mixing bowl, beat softened cream cheese until smooth. Fold in whipped topping until fluffy and spreadable.
Spread this gently over the cooled crust using a spatula.
Step 3: Add the Fruit Layer
If using fresh fruit, mix it with lemon juice and a spoonful of honey or jam. Let it sit for a few minutes so the juices release slightly.
Spoon the fruit evenly over the cream layer. If using preserves, spread them gently with a spatula.
Step 4: Chill and Slice
Cover the dish and refrigerate for at least 2 hours to firm up. Once chilled, cut into squares or rectangles using a clean, sharp knife.
Decoration & Serving Tips
- Garnish with mint leaves or lemon zest for a fresh touch
- Sprinkle with crushed vanilla cookies or chopped nuts
- Serve chilled on colorful plates for a summery look
- Add a swirl of extra whipped topping before serving
Variations to Try
- Tropical Vibe: Use mango and pineapple with coconut whipped cream
- Berry Lemon: Add lemon zest and use blueberries and strawberries
- Yogurt Base: Replace cream cheese with thick Greek yogurt for tang
- Crumble Top: Add an oat and brown sugar crumble layer for texture
Storing Tips
- Store in an airtight container in the fridge for 3–4 days
- Not freezer-friendly due to the whipped topping
- For best texture, serve chilled
- Avoid stacking to keep layers intact
Extra Tips
- Chill each layer briefly before adding the next for clean results
- Use fresh, ripe fruit for the best taste
- Press crust firmly so it holds together after baking
- A serrated knife helps cut through fruit without smearing
Common Mistakes & Fixes
| Mistake | Fix | Prevention |
|---|---|---|
| Soggy crust | Chill longer before cutting | Let crust cool fully |
| Fruit layer runs | Drain excess juice | Use thicker fruit or preserves |
| Cream layer too soft | Chill longer | Use stabilized whipped topping |
| Crust cracks | Add 1 tbsp more butter | Press crust evenly before baking |
Summer Dessert Bars
Soft, chilled dessert bars with a buttery crust, creamy filling, and seasonal fruit — perfect for summer gatherings.
Ingredients
- All-purpose flour
- Butter
- Powdered sugar
- Cream cheese
- Whipped topping
- Fresh fruit
- Honey or jam
- Lemon juice
Instructions
<ol><ul><li>Mix crust and bake<br/></li><li>Beat cream cheese and fold in whipped topping<br/></li><li>Spread over crust<br/></li><li>Top with fruit<br/></li><li>Chill and slice</li></ul></ol>
Notes
Use fresh or jammed fruits
Chill completely before slicing
Press crust firmly
Avoid stacking after slicing
Let’s Chill and Serve These Summer Dessert Bars
These summer dessert bars are a perfect way to cool off and enjoy fresh, sweet flavors all season long.
Make them with your favorite fruits, chill them well, and enjoy a slice of summer in every bite.
Let us know which variation you tried in the comments!