Blue Hydrangea Cupcakes – Explore Color In Every Bite!
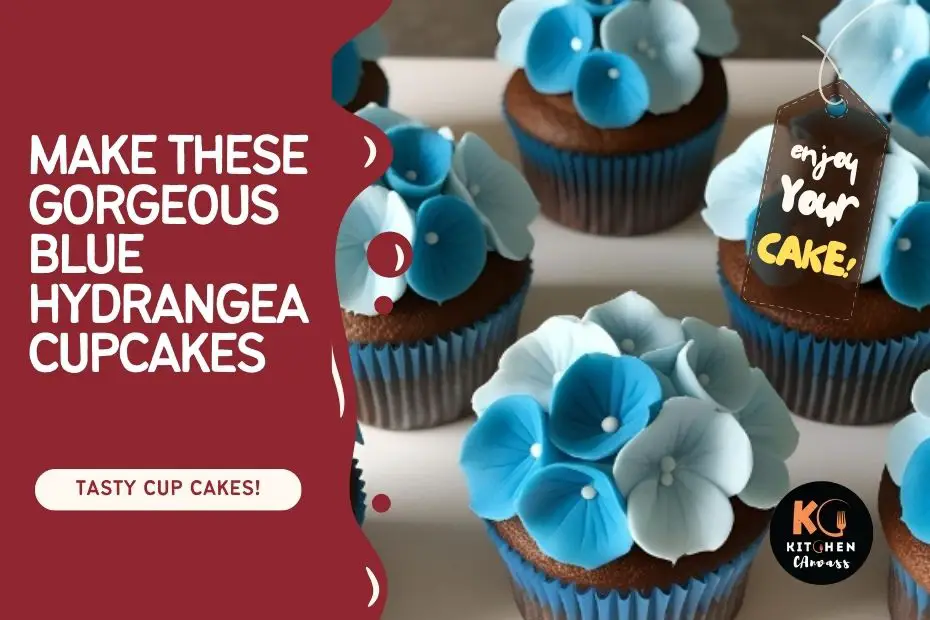
Blue Hydrangea Cupcakes are not just cupcakes, they’re edible art.
Designed to resemble blooming hydrangea flowers, these soft vanilla cupcakes are topped with stunning two-toned buttercream petals that mirror the elegance of real hydrangeas.
These cupcakes are perfect for garden parties, weddings, baby showers, and any celebration where presentation matters as much as taste.

Prep & Baking Overview
| Prep Time | Bake Time | Decorating Time | Total Time | Servings |
|---|---|---|---|---|
| 25 mins | 18–20 mins | 25–30 mins | ~1 hour 15 mins | 12 |
Ingredients & Alternatives
| Ingredient | Quantity | Alternatives |
|---|---|---|
| All-purpose flour | 1½ cups | Cake flour (for lighter texture) |
| Baking powder | 1½ tsp | N/A |
| Salt | ½ tsp | Sea salt |
| Unsalted butter (softened) | ½ cup | Vegan butter |
| Granulated sugar | ¾ cup | Coconut sugar |
| Eggs | 2 large | Flax eggs for vegan option |
| Vanilla extract | 1½ tsp | Almond extract for a different note |
| Whole milk | ½ cup | Buttermilk or plant-based milk |
Buttercream Frosting:
| Ingredient | Quantity | Alternatives |
|---|---|---|
| Unsalted butter (softened) | 1 cup | Dairy-free butter |
| Powdered sugar | 3–4 cups | Sugar-free powdered blend (e.g., Swerve) |
| Vanilla extract | 1 tsp | Almond or floral extract |
| Heavy cream or milk | 2–3 tbsp | Coconut or oat milk |
| Gel food coloring (blue, purple) | A few drops | Natural colors from blueberry or beetroot |
Tools & Equipment
| Tool | Alternatives |
|---|---|
| Cupcake pan (12 wells) | Silicone molds |
| Cupcake liners | Greased wells without liners |
| Electric mixer | Hand whisk (more effort required) |
| Piping bags | Zip-top bags with snipped corners |
| Open star piping tip | Wilton 2D or 1M for floral effects |
| Bowls and spatula | Any mixing utensils |
| Toothpicks | For adjusting swirl in piping bag |
How to Make Blue Hydrangea Cupcakes
Creating these floral cupcakes involves a balance between baking soft vanilla cupcakes and learning a gentle piping technique to mimic blooming petals.
Step 1: Bake the Cupcakes
Preheat your oven to 350°F (175°C) and line a 12-well cupcake pan.
In a bowl, sift together flour, baking powder, and salt. In a separate large bowl, cream together the butter and sugar until light and fluffy (about 3 minutes). Add eggs one at a time, beating well after each. Mix in vanilla extract.
Add the flour mixture in two additions, alternating with the milk. Mix until just combined. Avoid overmixing to keep the batter light.
Spoon the batter evenly into the cupcake liners, filling them about ⅔ full. Bake for 18–20 minutes or until a toothpick inserted in the center comes out clean.
Let cupcakes cool in the pan for 5 minutes, then transfer to a wire rack to cool fully before frosting.
Step 2: Prepare the Buttercream
Beat the softened butter on medium speed until creamy and light (about 3 minutes). Add powdered sugar gradually, mixing well.
Add the vanilla and cream, and beat until the frosting becomes fluffy and pipeable.
Divide frosting into two or three bowls, depending on your color pattern.
Add a small amount of gel food coloring to each (blue, lavender, and white or another combo). Mix until the desired shades are achieved.
Step 3: Assemble the Piping Bag
For a multicolor floral effect:
- Lay out a piece of plastic wrap and pipe thin lines of each color along it side-by-side.
- Roll into a log and snip one end.
- Insert the log into a piping bag fitted with a large star tip.
Alternatively, you can stripe the piping bag by brushing the inside with food coloring and filling it with white frosting.
Step 4: Pipe the Hydrangeas
Pipe petals in small bursts, starting from the outer edge of the cupcake and working inward in layers.
Hold the piping tip straight up and apply consistent pressure for full blossoms. Repeat to cover the entire top with rosette-style petals.
Serving Tips
- Presentation: Serve on a white or pastel platter to let the colors pop. These look best when displayed like a bouquet.
- Pairing: Serve with floral teas (like jasmine or chamomile) or light lemonades for a garden-party feel.
- Themed Displays: Add fondant leaves, mini butterflies, or edible glitter for an even more magical touch.
- Mini Version: Use a mini cupcake pan for bite-sized hydrangea puffs, ideal for tea parties or baby showers.
Variations to Try
- Lavender Hydrangea Cupcakes: Use purple and light violet tones for a calming floral look. Add lavender extract to the batter and frosting.
- Strawberry Hydrangea Cupcakes: Add chopped strawberries to the cupcake base and use pink and cream tones for the hydrangea petals.
- Pink and Blue Hydrangea Cupcakes: Great for eyes variation—use alternating pink and blue frosting lines for a surprise color mix.
- Blue and White Hydrangea Cupcakes: Elegant for weddings or baby parties, this combo looks especially clean and crisp when piped into rosettes.
These variations not only change the visual but offer slight flavor shifts to suit different themes or events.
Storing Tips
| Storage Method | Duration | Notes |
|---|---|---|
| Room Temperature | Up to 1 day | Store in a cool, dry area in a closed container |
| Refrigerated | 3–4 days | Best in airtight container; let come to room temp before serving |
| Freezer | 1 month (unfrosted) | Freeze cupcakes separately and decorate after thawing |
Common Mistakes & Fixes
| Mistake | Fix / Prevention |
|---|---|
| Frosting melts or loses shape | Chill cupcakes and use firm buttercream |
| Petals look messy or uneven | Practice on parchment before piping on cupcakes |
| Colors bleed into each other | Use gel colors and avoid overmixing in piping bag |
| Cupcakes rise unevenly | Ensure oven is preheated and do not overfill liners |
A Garden Blooms in Every Bite!
Blue Hydrangea Cupcakes are more than a treat, they’re a celebration of color, artistry, and soft flavor.
Whether you’re piping simple blooms or building a full floral fantasy with color variations, these cupcakes bring elegance and charm to every table.
The combination of soft vanilla cake and dreamy buttercream makes them a hit at weddings, brunches, and afternoon teas alike.
With a little practice and creativity, you can grow your own cupcake bouquet—no garden required.