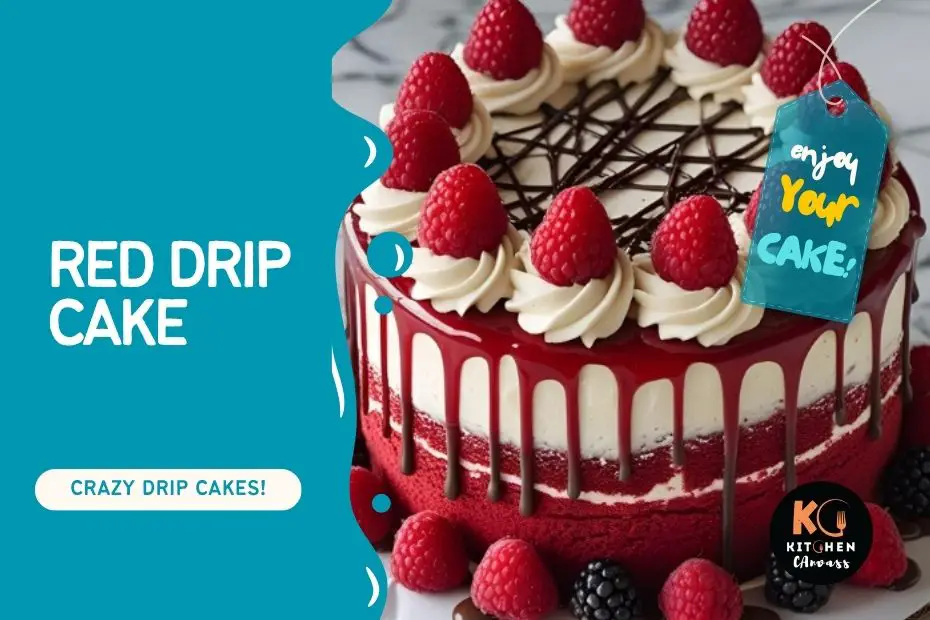
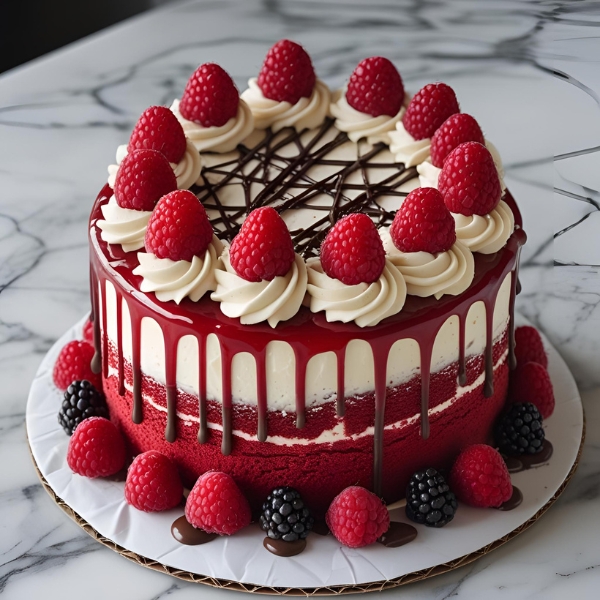
How to Make a Red Drip Cake That Stands Out
Red drip cakes aren’t just for spooky nights or Halloween tables. In fact, they’re one of the most stunning choices for romantic dinners, or even elegant parties.
The striking red ganache against a clean, frosted base is both modern and playful—an edible way to say something special.
This version avoids all the Halloween elements. No black cats, candy eyeballs, or blood-themed designs here.
Instead, you get a vibrant red drip that looks artistic over vanilla or cream-frosted layers.
With a little prep and the right drip consistency, the final result looks bakery-worthy—no tricks involved.
Quick Recipe Snapshot
| Prep Time | Cook Time | Total Time | Course | Cuisine | Servings |
|---|---|---|---|---|---|
| 25 minutes | 35 minutes | 1 hour | Dessert | Western | 10–12 slices |
Ingredients for Cake and Red Drip
| Ingredient | For 6 Servings | For 12 Servings | Alternatives |
|---|---|---|---|
| All-purpose flour | 1½ cups | 3 cups | Cake flour (for a softer texture) |
| Granulated sugar | 1 cup | 2 cups | Superfine sugar |
| Butter (softened) | ½ cup | 1 cup | Vegetable oil or margarine |
| Eggs | 2 | 4 | Greek yogurt or flaxseed mix |
| Milk | ½ cup | 1 cup | Oat milk or almond milk |
| Vanilla extract | 1 tsp | 2 tsp | Rosewater (for floral note) |
| Baking powder | 1½ tsp | 3 tsp | Self-raising flour (adjust flour ratio) |
| White chocolate chips (for drip) | ½ cup | 1 cup | Candy melts (red) |
| Heavy cream | ¼ cup | ½ cup | Coconut cream |
| Red gel food coloring | Few drops | Few drops | Beetroot powder (natural coloring) |
Tools You’ll Need (with Alternatives)
- Mixing bowls (or any deep container)
- Hand or stand mixer (or whisk with effort)
- Rubber spatula (or wooden spoon)
- Measuring cups/spoons (or kitchen scale)
- Two round cake pans (or springform pans)
- Cooling rack (or clean cutting board)
- Offset spatula (or butter knife)
- Microwave-safe bowl (or double boiler setup)
- Spoon or piping bag (or zip-top bag with snipped corner)
How to Make a Red Drip Cake
Before diving in, set up all your ingredients and tools. Make sure your cake is fully cooled before frosting and applying the drip to ensure smooth results.
Step 1: Prepare the Batter
Cream the butter and sugar until pale and fluffy. Add eggs one at a time. Sift together the flour and baking powder in another bowl.
Alternate adding the dry mix and milk to the butter mixture, stirring gently. Finish by adding vanilla and mix until smooth.
Step 2: Bake and Cool
Preheat oven to 350°F (175°C). Grease and line two pans. Divide the batter and bake for 30–35 minutes.
Once done, cool in pans for 10 minutes, then move to a rack. Make sure the layers are completely cool before you frost.
Step 3: Frosting the Cake
Use a simple buttercream or whipped cream cheese frosting for a light contrast. Apply a thin crumb coat and refrigerate the cake for 15–20 minutes.
Then apply a smooth top layer. Use a spatula to flatten and clean up edges.
Step 4: Make the Red Drip
Heat cream until steaming. Pour over white chocolate chips. Let sit for 1 minute, then stir until smooth.
Add red food coloring gel until you get a vivid tone. Let the mixture sit until slightly thickened but still pourable.
Step 5: Apply the Drip
Using a piping bag or spoon, gently drip the red ganache along the cake’s edge. Let gravity do the work.
Add more in the center and spread it slightly if you want a shiny red top.
Step 6: Final Decoration
Use rose petals, gold foil, heart sprinkles, or sliced strawberries for a romantic look. For a clean finish, leave it minimal and glossy.
Decoration & Serving Suggestions
- Use red velvet crumbs to garnish the base
- Add a heart-shaped topper or handwritten message
- Serve with fresh strawberries or cherries
- Great with coffee, milk, or champagne for formal occasions
Cake Variations to Try
- Strawberry Vanilla Layers: Add strawberry puree to batter
- Rose and Red Theme: Use rosewater frosting and rose petal topping
- Chocolate Base: Make it a red drip over rich dark chocolate cake
- Mini Cakes: Use smaller pans for individual red drip minis
Storage Tips
- Store in the fridge for up to 4 days in an airtight container
- Let sit at room temp 15–20 minutes before serving
- Freeze slices wrapped in foil and cling film (up to 2 months)
Additional Tips
- Gel food coloring works best—liquid can water down the drip
- Drip too runny? Let it cool 5 more minutes
- Want a deeper red? Add a pinch of cocoa powder
- For a matte drip, refrigerate the cake uncovered briefly
Mistakes and How to Prevent Them
| Mistake | Solution | Prevention |
|---|---|---|
| Drip slides off cake | Let drip cool longer | Chill cake before applying |
| Cake dome on top | Trim with serrated knife | Use cake strips or lower oven temp slightly |
| Crumb coat pulls cake | Use thinner frosting layer | Chill cake before frosting |
| Drip turns pink | Add extra red gel or beet powder | Use quality gel coloring |
Let’s Make and Show Off That Red Drip Cake
Now that you’ve got the steps and tips, it’s time to bring that red drip cake to life.
Whether it’s for a celebration or just because, this cake makes a bold impression.
Bake it, share it, and tell us how it turned out—don’t forget to post your version with a creative twist!