Lets Make an Ice Cream Cone Drip Cake!
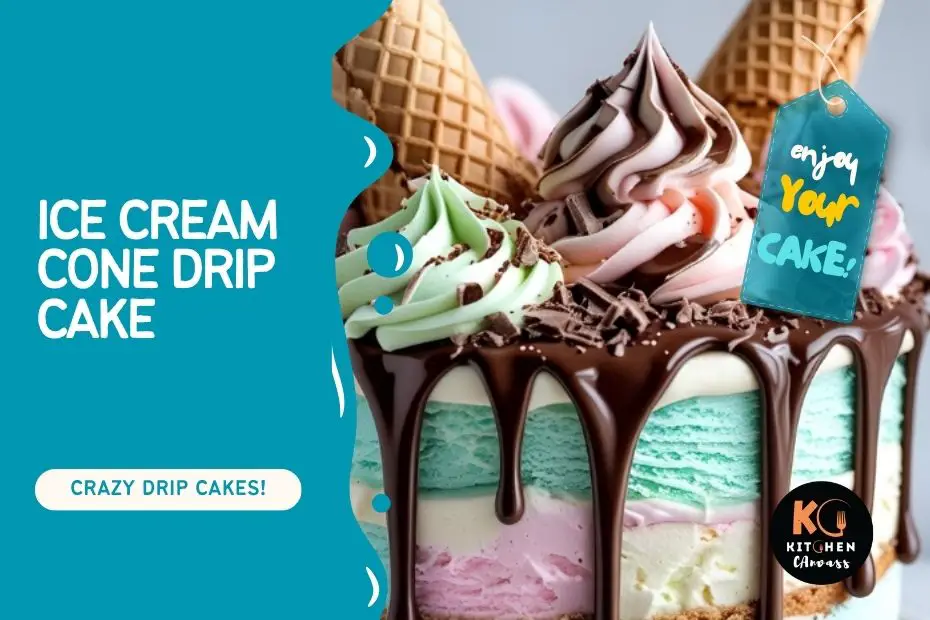
An ice cream cone drip cake brings whimsy and fun to any celebration.
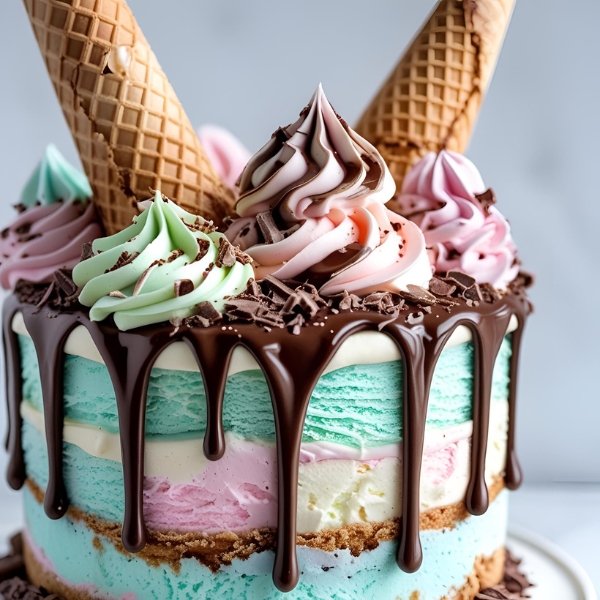
It’s a layered cake decorated with melting “drips” and topped with upside-down ice cream cones that look like playful, colorful scoops falling onto the cake.
The drip effect, usually made with ganache or glaze, adds a glossy finish that mimics melting ice cream.
This cake isn’t just charming to look at; it’s also a delightful treat with moist layers and smooth frosting beneath the playful cones.
It’s a popular choice for kids’, summer parties, or anytime you want to add a touch of joyful surprise to your dessert table.
Recipe at a Glance
| Prep Time | Cook Time | Total Time | Course | Cuisine | Servings |
|---|---|---|---|---|---|
| 30 minutes | 40 minutes | 1 hour 10 minutes | Dessert | Western | 10–12 slices |
Ingredients List
| Ingredient | For 6 Servings | For 12 Servings | Alternatives |
|---|---|---|---|
| All-purpose flour | 1½ cups | 3 cups | Cake flour (for lighter crumb) |
| Granulated sugar | 1 cup | 2 cups | Superfine sugar |
| Butter (softened) | ½ cup | 1 cup | Margarine or oil |
| Eggs | 2 | 4 | Flax eggs or yogurt |
| Milk | ½ cup | 1 cup | Almond or oat milk |
| Vanilla extract | 1 tsp | 2 tsp | Almond or lemon extract |
| Baking powder | 1½ tsp | 3 tsp | Self-rising flour (adjust flour amount) |
| White or chocolate candy melts (for drip) | ½ cup | 1 cup | Ganache or melted chocolate chips |
| Heavy cream | ¼ cup | ½ cup | Coconut cream |
| Ice cream cones (for decoration) | 4 cones | 8 cones | Waffle cones or sugar cones |
| Sprinkles (for decoration) | 2 tbsp | ¼ cup | Edible glitter or crushed nuts |
Tools You’ll Need (with Alternatives)
- Mixing bowls (or large containers)
- Hand or stand mixer (or whisk)
- Measuring cups and spoons (or kitchen scale)
- Two round cake pans (or springform pans)
- Cooling rack (or clean plate)
- Offset spatula (or butter knife)
- Microwave-safe bowl (or double boiler)
- Spoon or piping bag (or zip-top bag with corner cut)
How to Make the Ice Cream Cone Drip Cake
Before starting, ensure all ingredients are measured and your workspace is clean. The ice cream cones are used purely for decoration and applied at the end.
Step 1: Prepare the Cake Batter
Cream the softened butter and sugar until pale and fluffy. Beat in eggs one at a time. In a separate bowl, sift the flour and baking powder.
Alternate adding dry ingredients and milk to the butter mixture. Add vanilla last and mix until smooth.
Step 2: Bake and Cool the Cake
Preheat the oven to 350°F (175°C). Grease and line the pans. Divide the batter evenly and bake for 35–40 minutes, or until a toothpick comes out clean.
Cool completely on a wire rack.
Step 3: Frost the Cake
Choose your favorite frosting—vanilla buttercream, cream cheese, or chocolate ganache works well.
Apply a thin crumb coat and chill for 15 minutes. Then frost smoothly and chill again for best results.
Step 4: Make the Drip
Heat heavy cream until steaming and pour over the candy melts or chocolate chips. Let it sit for a minute, then stir until smooth and glossy.
Let cool slightly so it thickens but stays pourable.
Step 5: Apply the Drip
Using a spoon or piping bag, gently drip the melted candy or chocolate along the edges of the cake.
Fill the center with remaining drip and smooth lightly.
Step 6: Decorate with Ice Cream Cones and Sprinkles
Place the ice cream cones upside down around the top edges or center of the cake to mimic melting scoops.
Add sprinkles generously on top and around the cones before the drip sets.
Decoration & Serving Suggestions
- Use pastel-colored cones for a soft look
- Add edible flowers or fruit slices around cones
- Serve with scoops of real ice cream on the side
- Perfect for summer parties and kids’ birthdays
Variations to Try
- Chocolate and Vanilla Combo: Use chocolate cake layers with vanilla frosting and white chocolate drip for contrast. Top with classic sugar cones.
- Rainbow Drip and Cones: Use colored candy melts for drip in multiple colors and decorate cones with matching sprinkles for a vibrant look.
- Salted Caramel Drip: Add caramel drizzle over the drip for a sophisticated flavor. Use waffle cones for crunch.
- Mini Ice Cream Cone Cakes: Make cupcakes and decorate each with a mini cone and drip for individual servings.
Storage Tips
- Keep refrigerated until serving
- Cover loosely with plastic wrap to protect frosting
- Consume within 3 days for best freshness
- For longer storage, freeze slices wrapped in foil and thaw before serving
Extra Tips for a Perfect Cake
- Chill cake well before applying drip to avoid melting
- Use high-quality candy melts or chocolate for a shiny finish
- Place cones carefully to avoid tipping or sliding
- Add sprinkles immediately after drip application for best adhesion
Common Mistakes & Prevention
| Mistake | Solution | Prevention |
|---|---|---|
| Drip too thin, runs off cake | Let drip cool to thicken | Chill cake before drip |
| Cones tip or fall off | Press cones gently into frosting | Chill cake before decorating |
| Sprinkles sink into drip | Add sprinkles right after drip | Apply sprinkles at correct drip thickness |
| Uneven cake layers | Trim cake tops before frosting | Use baking strips or rotate pans |
Let’s Create and Celebrate with Your Ice Cream Cone Drip Cake
This cake combines playfulness and elegance in one delicious package. Bake, decorate, and share your version.
We’d love to hear your ideas and how you made it uniquely yours!