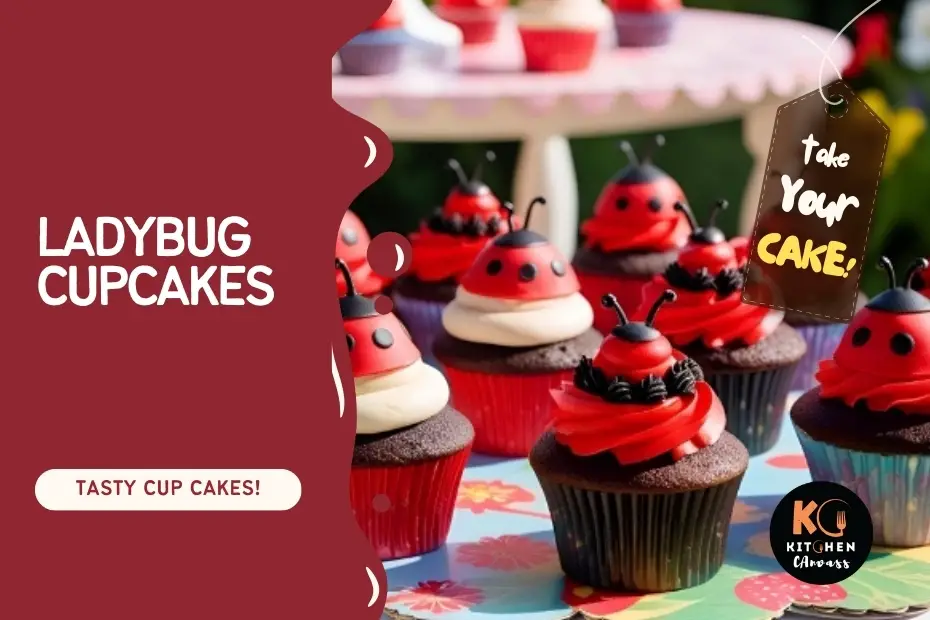
Ladybug Cupcakes Recipe
Ladybug cupcakes are delightful, charming treats that are perfect for themed parties, or any celebrations.
These cupcakes aren’t just adorable—they’re also rich in flavor and easy to decorate with simple techniques.
The base is typically a soft vanilla or chocolate cupcake, topped with red icing, black accents, and a sweet edible ladybug face.
Let’s dive into the full process of making and decorating these sweet little ladybug cupcakes from scratch.

Prep Time, Cook Time & Serving Info
- Prep Time: 25 minutes
- Cook Time: 18–20 minutes
- Total Time: 45 minutes
- Course: Dessert
- Cuisine: American
- Servings: 12 cupcakes
Ingredients
For the Cupcakes
- 1 ½ cups all-purpose flour
- 1 cup granulated sugar
- ½ cup unsalted butter (softened)
- 2 large eggs
- ½ cup whole milk
- 1 ½ teaspoons baking powder
- 1 teaspoon vanilla extract
- ¼ teaspoon salt
For the Frosting & Decoration
- 1 cup unsalted butter (softened)
- 3–4 cups powdered sugar
- 2–3 tablespoons heavy cream or milk
- 1 teaspoon vanilla extract
- Red gel food coloring
- Black gel icing or melted chocolate
- Edible candy eyes or white chocolate chips with black dot
- Mini Oreo cookies or black fondant (for head)
How to Make Ladybug Cupcakes
Step 1: Prepare the Cupcake Batter
Start by preheating your oven to 350°F (175°C). Line a cupcake tray with paper liners. In a large mixing bowl, cream the butter and sugar until light and fluffy.
Add the eggs one at a time, beating well after each addition. Stir in the vanilla extract.
In another bowl, combine the flour, baking powder, and salt. Add the dry ingredients to the wet mixture in batches, alternating with milk. Mix until you get a smooth, lump-free batter.
Step 2: Bake the Cupcakes
Spoon the batter evenly into the cupcake liners, filling each about 2/3 full. Bake for 18–20 minutes or until a toothpick inserted in the center comes out clean.
Let the cupcakes cool in the pan for 5 minutes, then transfer to a wire rack to cool completely.
Step 3: Make the Buttercream Frosting
In a clean bowl, beat the softened butter until creamy. Gradually add the powdered sugar and continue mixing until fluffy.
Add in vanilla extract and cream or milk to adjust the consistency. Tint the frosting with red gel food coloring and beat until evenly colored.
Step 4: Frost the Cupcakes
Once the cupcakes are cool, frost the tops generously with red buttercream using a spatula or piping bag. Smooth the top to resemble the body of the ladybug.
Step 5: Add Ladybug Features
- Use black gel icing or melted chocolate to draw a line down the center of each cupcake for the wings.
- Add dots on each side of the wings to mimic the ladybug’s spots.
- Place a mini cookie or a shaped fondant piece at the front for the head.
- Attach candy eyes to the head using a bit of icing as glue.
- Optionally, pipe two small antennae using black icing for added cuteness.
Variations to Try
Here are a few fun ways to customize your Ladybug Cupcakes:
- Chocolate Ladybugs: Use a rich chocolate cupcake base instead of vanilla. Just swap the flour for cocoa powder in part (½ cup cocoa powder + 1 cup flour).
- Strawberry Ladybugs: Add ¼ cup of pureed strawberries to the batter and frosting for a fruity twist that complements the red color naturally.
- Fondant Finish: Use red fondant for the wings and black fondant for the head and spots for a cleaner, more polished look—perfect for events.
- Mini Ladybug Bites: Make mini cupcakes and decorate in the same style. They’re great as party finger food or lunchbox surprises.
Each variation keeps the ladybug look while allowing you to adapt the flavor and finish based on your needs or ingredients on hand.
Storage Tips
- Store the decorated cupcakes in an airtight container at room temperature for up to 2 days.
- For longer storage, refrigerate for up to 5 days, but allow them to come to room temperature before serving to enjoy the full flavor.
- Avoid stacking the cupcakes directly to preserve the decoration.
Tips for Perfect Ladybug Cupcakes
- Use gel food coloring for a vibrant red frosting without watering it down.
- If using melted chocolate for the lines and spots, let it cool slightly before applying to prevent melting the frosting.
- For precise detailing, use a fine-tip piping bag or a clean toothpick.
Final Thoughts: A Sweet Celebration of Creativity
Ladybug cupcakes are more than just dessert—they’re a fun and joyful project that kids and adults will both love. From baking to decorating, every step offers a chance to be creative and festive. Whether you’re throwing a themed party or just want to brighten up your dessert table, these charming cupcakes are sure to impress with both flavor and flair.
So roll up your sleeves, gather your ingredients, and bring these adorable little ladybugs to life—one sweet bite at a time!